• Skip to primary navigation
  • Skip to main content
  • Skip to primary sidebar

Simply Designing with Ashley

  • DIY
  • Oils
  • Recipes
  • Craft
  • Travel
  • Decor
  • Holiday
menu icon
go to homepage
  • DIY
  • Oils
  • Recipes
  • Craft
  • Travel
  • Decor
  • Holiday
search icon
Homepage link
  • DIY
  • Oils
  • Recipes
  • Craft
  • Travel
  • Decor
  • Holiday
×

How to Make Hanging Ghosts - a PB Knock-Off

Published: Oct 28, 2011 · Modified: Oct 27, 2021 by Ashley Phipps · 343 words. · About 2 minutes to read this article. · 86 Comments · This post may contain affiliate links · This blog generates income via ads and sponsored posts · This blog uses cookies · See our privacy policy for more info Filed Under: Craft, Holiday

Want to know how to make hanging ghosts from Pottery Barn for a lot less than you can buy them for? Here's a Pottery Barn knock-off that makes the perfect not-so-spooky Halloween decor for your front porch!


Want to know how to make hanging ghosts from Pottery Barn? Here's a Pottery Barn knock-off that makes the perfect not-so-spooky Halloween decor for your front porch!

I love Pottery Barn, but I don't always love the price.  When I saw their Halloween line this year, I realized that I could easily make Pottery Barn's Hanging Ghosts; at a fraction of the cost!

To make outdoor hanging ghosts you will need:

(affiliate links included for your convenience)

  • Styrofoam balls (8", 6", 4")
  • Black craft paint
  • Small paint brush
  • Cheesecloth (I used about 2 yds per ghost, in 1-yard squares, for a total of 6 yds)
  • Eye screws (3)
  • E6000 Glue

How to make outdoor hanging ghosts instructions:

First, you will want to insert your eye screws into the top of each styrofoam ball using your glue.  Let this dry completely.  If you're a little bit crazy like me, you will want to paint these white so that they blend in with the ghost.

Want to know how to make hanging ghosts from Pottery Barn for a lot less than you can buy them for? Here's a Pottery Barn knock-off that makes the perfect not-so-spooky Halloween decor for your front porch!

Next, use your black craft paint to paint ghost eyes on each styrofoam ball.  Let dry completely.

Want to know how to make hanging ghosts from Pottery Barn for a lot less than you can buy them for? Here's a Pottery Barn knock-off that makes the perfect not-so-spooky Halloween decor for your front porch!

Take (2) 1-yard squares and place them over the top each styrofoam ball.

Want to know how to make hanging ghosts from Pottery Barn for a lot less than you can buy them for? Here's a Pottery Barn knock-off that makes the perfect not-so-spooky Halloween decor for your front porch!

Using scissors, cut "rips" in the cheesecloth.

Want to know how to make hanging ghosts from Pottery Barn for a lot less than you can buy them for? Here's a Pottery Barn knock-off that makes the perfect not-so-spooky Halloween decor for your front porch!

Take each shred in your hand and stretch it down.  This will create a tattered look in the cheesecloth.

What do you think?

Here are Pottery Barn's Hanging Ghosts.  They retail for $59.00 for the set of three.

Want to know how to make hanging ghosts from Pottery Barn for a lot less than you can buy them for? Here's a Pottery Barn knock-off that makes the perfect not-so-spooky Halloween decor for your front porch!

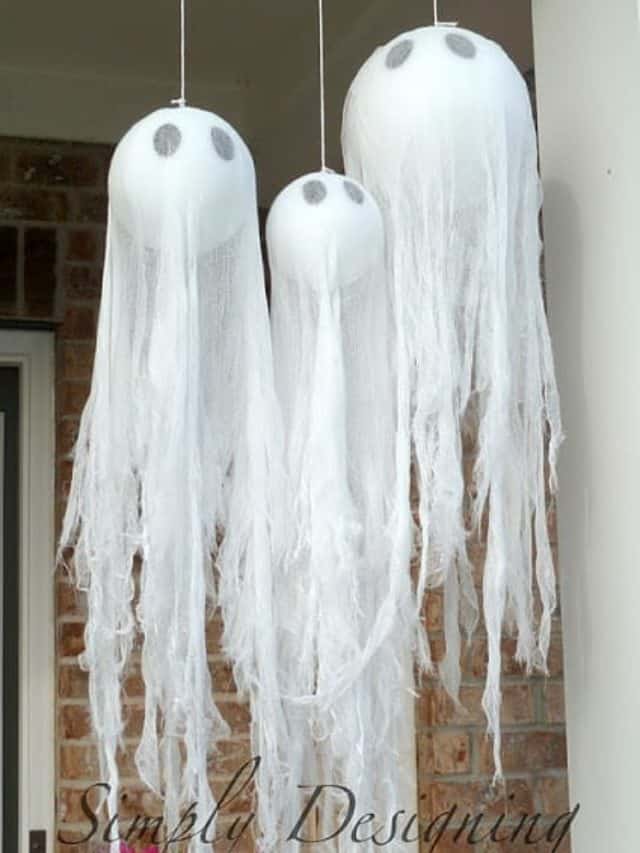
And here are my Hanging Ghosts.  They cost less than $15.00 for the set of three.

Want to know how to make hanging ghosts from Pottery Barn for a lot less than you can buy them for? Here's a Pottery Barn knock-off that makes the perfect not-so-spooky Halloween decor for your front porch!

Pretty cute huh?  I love my new hanging ghosts!  And I am so happy to finally have some cuter outdoor Halloween decor!

Also be sure to check out my Floating Head Hanging Ghosts too:
floating head hanging ghosts | How to Make Hanging Ghosts - a PB Knock-Off | 1 | Hanging Ghosts
 
You might also like:

DIY Hanging Ghost Lantern turned on and hanging up

DIY Hanging Ghost Lantern

 
Halloween Treat Containers (PB Knock Off)
 
Pottery Barn Knock Off Treat Containers
 
Ghost Halloween Treat Cups #halloween #fall #candy #crafts
 
Halloween Treat Cups
 
How to Carve a Pumpkin in 15 Minutes #Halloween #pumpkin #pumpkincarving #jackolantern #crafts
 
How to Carve a Pumpkin in 15 Minutes

Hanging Ghosts

Hanging Ghosts


How to make Hanging Ghosts

More Crafts

  • looking from the top down on a body scrub made with salt with greenery on the top of the photo and a wood lid to the right
    How to make a Salt Scrub
  • greenery hoop wreath with lavender and burlap bow
    Summer Hoop Wreath
  • DIY farmhouse christmas ornaments
    How to make Farmhouse Christmas Ornaments
  • Peppermint Sugar Scrub in a glass jar with red and white twine around the jar
    Peppermint Sugar Scrub

Reader Interactions

Comments

  1. Sayrah

    August 21, 2014 at 2:54 am

    Love this idea, so going to use this! Thank you so much!

    Reply
    • Ashley Phipps

      August 21, 2014 at 9:46 am

      Oh thank you!!

      Reply
    • Mollie

      September 15, 2014 at 1:10 pm

      Yours are so very impressive, much nicer then Pottery Barns...Thanks for the great ideas.

      Reply
  2. Ann Flowers

    August 31, 2014 at 10:02 pm

    I love this idea and will absolutely make a trio for my home. BTW, I really and seriously like your ghost trio better than the PB trio.

    Reply
    • Ashley Phipps

      September 02, 2014 at 8:21 am

      Thank you so much! And you really are the sweetest to say that! Thank you 🙂

      Reply
  3. Kristine

    August 31, 2014 at 11:47 pm

    I like your ghosts better than Pottery Barn's! Thanks for the tutorial!

    Reply
    • Ashley Phipps

      September 02, 2014 at 8:20 am

      Awwww thank you so much Kristine!!! You are the sweetest! And thanks for stopping by!

      Reply
  4. Terry Boyle

    September 04, 2014 at 9:40 am

    I love this idea...so-oo clever. Thanks so much for sharing. Do you think these would tolerate weather? I would like to hang them from trees in the yard.

    Reply
    • Ashley Phipps

      September 04, 2014 at 10:59 pm

      I keep mine out all October long and they have held up well! The cloth gets more ragged with age but I think that makes them look even better 🙂

      Reply
  5. Ruth

    September 06, 2014 at 10:17 pm

    Thank you for showing us how to make these great ghosts, Ashley, Halloween is just starting to become noticed here in Australia, and more and more people are participating each year. It is a lot of fun, and these ghosts will be hanging on our front verandah this year.

    Reply
    • Ashley Phipps

      September 06, 2014 at 11:51 pm

      You are welcome!!! Thanks so much for stopping by Ruth!

      Reply
  6. Susannah

    September 08, 2014 at 11:33 am

    Hello please let me know where you purchased the styrofoam 8-inch the cheapest I have found is 15.99!! Thanks! Love your site can't wait to try a few of everything!

    Reply
    • Ashley Phipps

      September 09, 2014 at 11:30 pm

      Hi!! I have only seen these for sale at Hobby Lobby, but I think you can find them at other crafts stores too. I would suggest using a coupon to save on it though! Thanks and good luck!

      Reply
      • Susannah

        September 12, 2014 at 4:51 pm

        Thank you!

        Reply
    • Mikki Mills

      July 19, 2015 at 3:18 pm

      If you have a Michael's, A C Moore, or Joanne's near you, I would try them. Even some Walmarts have craft sections. They should all have them much cheaper than that!

      Reply
  7. Elizabeth

    September 11, 2014 at 11:46 am

    This is darling and so easy!! Thank you for a great tutorial and idea! Pinned!

    Reply
    • Ashley Phipps

      September 13, 2014 at 4:16 pm

      Thank you so much and thanks for pinning!

      Reply
    • Ashley Phipps

      September 14, 2014 at 11:28 pm

      Oh thank you so much Elizabeth!

      Reply
  8. Emily

    September 13, 2014 at 11:06 am

    these are a little creepy, but super cute too ;o) sharing it today in the Create Link Inspire features crafts addition over at Nap-Time Creations... pinned, tweeted and shared on FB... I'd love a retweet or fb share to help spread the word! Happy weekend.

    Reply
    • Ashley Phipps

      September 13, 2014 at 4:16 pm

      Oh thank you so much Emily!!

      Reply
  9. Bonnie @ The Pin Junkie

    September 18, 2014 at 9:00 pm

    You did a great job on these ghosts! They look just like the ones from Pottery Barn, but for so much less! Thanks for sharing them at The Pin Junkie! They're one of the features this week at http://www.thepinjunkie.com/2014/09/pin-junkie-pin-party-85.html

    Reply
  10. Kristina and Millie

    September 18, 2014 at 9:22 pm

    LOVE!!! These are the best ghosts ever! I would leave them out year round though, they are too cute to put away!

    Reply
    • Ashley Phipps

      September 19, 2014 at 12:05 pm

      Oh thank you so much!! 🙂

      Reply
  11. Betsy @ HappilyEverafteretc.

    September 18, 2014 at 10:41 pm

    These are seriously the cutest thing! This is the first year my hubby and I live in a house instead of an apartment... so we finally have the space for outdoor decorations! Other than your traditional pumpkin and maybe a bale of hay I wasn't sure what to do... these will be perfect! Great job!

    Reply
    • Ashley Phipps

      September 19, 2014 at 12:05 pm

      Oh thank you so much!! Your comments are so sweet! I hope you have fun making these!! And Happy Halloween!

      Reply
  12. Jennifer

    September 19, 2014 at 8:36 am

    Simple enough that the kids could do it...love this!!

    Thanks for sharing 🙂

    Reply
    • Ashley Phipps

      September 19, 2014 at 12:04 pm

      Kids could definitely help make this!!! Thanks for stopping by Jennifer!

      Reply
  13. Katie Adams

    September 28, 2014 at 11:52 am

    Thanks for linking to Create Link Inspire at The Crafty Blog Stalker. You have been featured and pinned! Thank you for sharing.
    –Katie, TheCraftyBlogStalker.com

    Reply
  14. Sandy

    October 04, 2014 at 12:27 am

    I seriously had to scroll up, scroll down like 3 times to see which of the first 2 pics were actually PB. Yours look way cooler than theirs! For reals. On my project list. Thank you!!

    Reply
    • Ashley Phipps

      October 04, 2014 at 11:09 am

      Oh thank you so much Sandy!!! You are the sweetest!

      Reply
  15. Crystal

    October 12, 2014 at 2:32 pm

    Yours are WAY cuter and better looking than pottery barn's !!!!

    Reply
    • Ashley Phipps

      October 12, 2014 at 3:54 pm

      Oh thank you so much!

      Reply
  16. Becca

    October 13, 2014 at 7:23 pm

    Yours are way better than Pottery Barn! Making these tonight, thanks!!!

    Reply
  17. Jenny

    October 17, 2014 at 6:49 pm

    i usually never comment on posts but this one is awesome!! And yes, yours are way better than the Pottery Barn ones. Thanks for the idea!!!!

    Reply
  18. Peggy

    October 19, 2014 at 5:27 pm

    I love these. They look better than Pottery Barns

    Reply
    • Ashley Phipps

      October 21, 2014 at 3:06 pm

      Oh thank you so much Peggy!

      Reply
  19. Ellen dee

    October 19, 2014 at 7:20 pm

    I would hang with clear fishing line, so they would seem to float better

    Reply
  20. Julie

    October 29, 2014 at 3:04 pm

    I love these ghosts! They will look so great hanging on my porch! Thank you for sharing. One question: how do you adhere the cheesecloth to the styrofoam ball? Just simple glue? Or something else? Thanks!

    Reply
    • Ashley Phipps

      October 30, 2014 at 9:59 am

      That's a great question Julie! I actually did not attach the cheesecloth to the balls. It is held on by the hook I placed at the top of the ghost for hanging purposes. That I glued through the cheesecloth and into the styrofoam with E6000 glue and that is enough to hold them in place!

      Reply
  21. Rohan

    November 19, 2014 at 6:25 am

    What fun! Thanks for sharing you great ghosts ideas.

    Rohan

    Reply
  22. Mikki Mills

    July 19, 2015 at 3:20 pm

    Thank you, so much, for sharing this tutorial! These look WAY better than Pottery Barn's! If I had to buy, I would definitely choose yours over theirs!

    Reply
    • Ashley Phipps

      July 22, 2015 at 12:46 pm

      Thank you!!!

      Reply
  23. Giselle

    August 22, 2015 at 8:02 am

    Yours look waaaaaaaaay better!

    Reply
    • Ashley Phipps

      August 31, 2015 at 3:06 pm

      Aw thank you!

      Reply
  24. Pilar (Malaga - Spain)

    August 27, 2015 at 5:52 am

    Hello Ashley. Yours are the best.

    Reply
    • Ashley Phipps

      August 31, 2015 at 3:05 pm

      Thank you!

      Reply
  25. Jamie at RenoCompare

    September 25, 2015 at 10:08 am

    Great stuff Ashley! We'd like to share this in our latest Halloween decorations post. I'll get you the link when its live.

    Thanks Jamie

    Reply
    • Jamie at RenoCompare

      September 26, 2015 at 2:06 pm

      As promised Ashley!

      http://www.renocompare.com/2015/09/xx-of-the-best-diy-halloween-decoration-ideas/

      Thanks again, Jamie

      Reply
      • Ashley Phipps

        October 22, 2015 at 7:36 pm

        Thank you!

        Reply
  26. Linda

    October 15, 2015 at 6:11 pm

    I must have pinned this project two years ago and now this year I have all of the supplies and plan to make three of them this weekend. I did have a difficult time finding styrofoam balls that didn't cost a fortune...x 3 ghosts, but I found them! BYW... I just happened to stumble upon white styrofoam eye screws at Walmart. Thanks for this post!

    Reply
    • Ashley Phipps

      October 22, 2015 at 7:34 pm

      Oh I am so glad you finally found everything you needed at a reasonable price!! I bet they will turn out great! Thanks so much!

      Reply
  27. Blanca

    October 17, 2015 at 7:46 pm

    Yours are cuter than PB´s!

    Reply
    • Ashley Phipps

      October 22, 2015 at 7:33 pm

      Thank you! 🙂 You are too sweet.

      Reply
  28. Valerie

    October 16, 2016 at 10:11 am

    I'm a little late writing this as I'm just getting around to doing this craft with my kids, but I just wanted to let you know your ghosts are way more awesome than PB's! Probably something you've already heard, but it's true!! Thanks for sharing 🙂

    Reply
  29. Karen

    September 26, 2017 at 8:07 pm

    These turned out awesome but for the price I paid for everything I might as well have bought the PB ones lol. They still look better than them though!

    Reply
    • Ashley Phipps

      September 30, 2017 at 2:01 pm

      I am so sorry to hear that. When I made them, I only spent about $15 total to make all 3 ghosts. That is a huge savings over the original price of $59, in my opinion. But I completely realize that prices on things may have been different when I bought the supplies. But I completely agree! They are definitely cuter!!!

      Reply
  30. Ally

    October 30, 2017 at 9:15 am

    OMG these look so much cuter than the PB ones! What did you use to hang them on your porch? Going to do this tonight. Thanks for such a great idea! 🙂

    Reply
    • Ashley Phipps

      October 30, 2017 at 12:56 pm

      Thank you so much Ally! Oh great question, so sorry I didn't address this! We have large eye hooks screwed into a wood beam above our porch that just looped the string in. Super simple! And if you get big enough ones, you can hang a flower basket from them in the summer! 🙂

      Reply
  31. Amy D

    September 02, 2018 at 9:52 am

    Love these! On Halloween night, you could switch out the styrofoam balls for white balloons and put glow sticks inside to make them glow at night.

    Reply
  32. Linda

    October 14, 2019 at 4:22 pm

    I'm not sure if anyone has experienced this yet, but the glue on the link I purchased from amazon ate into the Styrofoam..I was unable to use two of the Styrofoam balls I had purchased and had already decorated. I will let Amazon know in case they are unaware of the problem

    Reply
    • Ashley Phipps

      October 22, 2019 at 3:27 pm

      I am so sorry you experienced this. Styrofoam can be finicky sometimes, but I haven't experienced this glue eating styrofoam. I'm so so sorry.

      Reply
  33. Tina

    December 08, 2019 at 11:03 pm

    I'm a huge fan of Halloween, and now I'm kinda sad that I didn't find this post in October...

    Nevertheless, 2020 here I come! 😀

    Thank you for sharing!

    Reply
    • Ashley Phipps

      December 09, 2019 at 3:47 pm

      You're welcome!

      Reply
  34. Sheila

    September 12, 2020 at 7:02 am

    Yours look so much better than pottery barn ghosts, way overpriced too. I love when I look at products for Holidays and then make them myself for so much less. Excellent job, I will be making these this October. Thanks for the great idea.

    Reply
  35. Leona June Bell

    October 01, 2020 at 3:20 am

    I was wondering what you're using to hang it with are you using string or yarn. And what do you use to keep the cheesecloth from blowing off are you spraying glue onto the foam balls?

    Reply
  36. Allison

    October 17, 2020 at 12:47 am

    I made these this year and I'm SO tickled with how they turned out!! Wish I could attach a picture, they really look great.

    Reply
    • Christina Leaman

      October 19, 2020 at 9:11 am

      Ohhh! Please tag us on Instagram or Facebook. @simplydesigning We would LOVE to see how they turned out. Christina, SD Team

      Reply
  37. Cyndi

    September 07, 2021 at 11:39 pm

    Where is the best place to get cheesecloth? Do you just buy it by the yard at JoAnns? Thanks!

    Reply
    • Ashley Phipps

      September 13, 2021 at 5:08 pm

      I usually buy cheesecloth from Amazon (I share my direct link in this post for this). But sometimes you can find it at JoAnn's as well. It just depends on what is available locally vs. online sometimes and the time of year I am looking for it!

      Reply
  38. Susan

    October 27, 2022 at 4:25 am

    The E6000 melted my styrofoam. 🙁 Hoping to find a way to salvage them, because they're not cheap where I live.

    Reply

Trackbacks

  1. 50 Easy DIY Halloween Decorations To Make for Your Home - mes emplois préférés says:
    September 24, 2021 at 11:22 am

    […] your porch with some of these simple hanging ghosts from Simply Designing. They were inspired by some Pottery Barn finds and we think they’re rather […]

    Reply
  2. Scary Outdoor Halloween Decorations That Will Make Your Neighbors Tremble With Fear - homedesignbudget.com says:
    October 17, 2021 at 4:59 am

    […] Speaking of ghosts, there’s more than one way to make your decorations look creepy. There’s always the cute bedsheet ghost idea which everyone is familiar with but there are also variations, like these floating head ghosts featured on simplidesigning. […]

    Reply
  3. Frightening Exterior Halloween Decorations That Will Make Your Next-door Neighbors Shiver With Concern - homedesignbudget.com says:
    October 19, 2021 at 8:11 am

    […] Mentioning ghosts, there’s greater than one means to make your designs look scary. There’s constantly the charming bedsheet ghost suggestion which everybody recognizes with yet there are additionally variants, like these drifting head ghosts included on simplidesigning. […]

    Reply
  4. Más de 50 decoraciones de porche delantero de Halloween 2017 - Tareas says:
    November 12, 2021 at 10:15 am

    […] vía porche […]

    Reply
  5. Best Home DIY Ideas to Try this Year! says:
    April 8, 2022 at 12:35 am

    […] More details of this DIY Project: simplydesigning.net […]

    Reply
  6. 40+ Easy DIY Halloween Decorations, Perfect for Outdoor and Indoor - Sharp Aspirant says:
    April 30, 2022 at 7:58 pm

    […] Get the tutorial on Simply Designing […]

    Reply
  7. DIY Halloween Decorations for Outdoor | Home Decor | Halloween Party says:
    July 10, 2022 at 9:50 am

    […] More details of this DIY Project: simplydesigning.net […]

    Reply
  8. 17 Easy DIY Halloween Decorations says:
    July 24, 2022 at 8:05 pm

    […] 11. Hanging Ghosts […]

    Reply
  9. 82 Best DIY Halloween Outdoor Decorations Ideas For 2022 says:
    July 25, 2022 at 11:35 pm

    […] Project details: simplydesigning.net […]

    Reply
  10. 28 DIY Dollar Store Halloween Decorations Ideas - Epic Saw Guy says:
    August 18, 2022 at 8:04 am

    […] Project details: simplydesigning.net […]

    Reply
  11. 35 Best DIY Halloween Props Ideas - Epic Saw Guy says:
    September 8, 2022 at 9:32 am

    […] Project details: simplydesigning.net […]

    Reply
  12. 32 DIY Dollar Store Halloween Decorations Ideas 2022 says:
    September 16, 2022 at 1:50 am

    […] Project details: simplydesigning.net […]

    Reply
  13. 40 Best DIY Halloween Props Ideas 2022 - Handy Keen says:
    September 18, 2022 at 2:42 am

    […] Project details: simplydesigning.net […]

    Reply
  14. 20 Best Halloween Ghost Decorations For A Spooky Outdoors - NMagz says:
    October 21, 2022 at 1:57 am

    […] 8. Hanging Ghosts. These Pottery Barn ghost knock-offs are budget-friendly and will be sure to delight your trick-or-treaters. To create these ghosts you will need: Styrofoam balls (8″, 6″, 4″), black craft paint, a small paint brush, cheesecloth (roughly 2 yards per ghost, in 1-yard squares, for a total of 6 yards), zinc-plated steel eye screw (3 pack), and glue. To begin this project, you will want to paint the black eyes on the ball and glue the eye screw to the top of the head. Cut the cheesecloth to drape over the heads and shred the bottoms with scissors. Affix with string or fishing line. Get more detailed instructions from the provided link. (via Simply Designing) […]

    Reply
  15. 20 Best Halloween Ghost Decorations For A Spooky Outdoors - Daisyrage says:
    October 21, 2022 at 2:03 am

    […] 8. Hanging Ghosts. These Pottery Barn ghost knock-offs are budget-friendly and will be sure to delight your trick-or-treaters. To create these ghosts you will need: Styrofoam balls (8″, 6″, 4″), black craft paint, a small paint brush, cheesecloth (roughly 2 yards per ghost, in 1-yard squares, for a total of 6 yards), zinc-plated steel eye screw (3 pack), and glue. To begin this project, you will want to paint the black eyes on the ball and glue the eye screw to the top of the head. Cut the cheesecloth to drape over the heads and shred the bottoms with scissors. Affix with string or fishing line. Get more detailed instructions from the provided link. (via Simply Designing) […]

    Reply
  16. Best Ideas for DIY Halloween Decorations | 2022 RenoCompare says:
    November 7, 2022 at 9:08 am

    […] Source: http://www.simplydesigning.net […]

    Reply

Leave a Reply Cancel reply

Your email address will not be published. Required fields are marked *

Primary Sidebar

Hello Friends!

Ashley Phipps Simply Designing I'm Ashley Phipps and I love sharing SIMPLE DIY, home, travel, food, craft and essential oil ideas with you! Learn more about me here. Contact me here. Find Media/PR info here. Privacy is important to us. Please read my Privacy Policy.
  • Email
  • Facebook
  • Instagram
  • Pinterest
  • Twitter
  • YouTube

Join our mailing list

Get our latest updates & exclusive content!

Privacy Policy, Disclaimer & Terms of Use

Favorite Posts

Himmeli Wreath with Shamrocks

St. Patrick's Day Himmeli Wreath

woman installing lpv flooring

How to Install LVP Flooring and Why it is my FAVORITE Flooring for Families


COPYRIGHT: You’re welcome to link to Simply Designing or use a single image with a brief description to link back to any post. Republishing posts in their entirety is strictly prohibited.  Any use for commercial purposes is strictly prohibited. Feel free to pin on Pinterest. Find out more in my Privacy Policy.  Simply Designing with Ashley Phipps LLC is a participant in the Amazon Services LLC Associates Program, an affiliate advertising program designed to provide a means for sites to earn advertising fees by advertising and linking to Amazon.com . Simply Designing with Ashley Phipps LLC and it’s owner, employees and affiliates are not liable in any way for injury or loss (whether physical, emotional, monetary or any other kind of loss) resulting from any inspiration, ideas, directions or information gained from this website. We advise you to always follow manufacturer instructions, take appropriate safety precautions and hire a professional when in doubt. We love it when you use our site for inspiration, but by using it, you agree that you do so at your own risk.

Privacy Policy 

Copyright © 2025