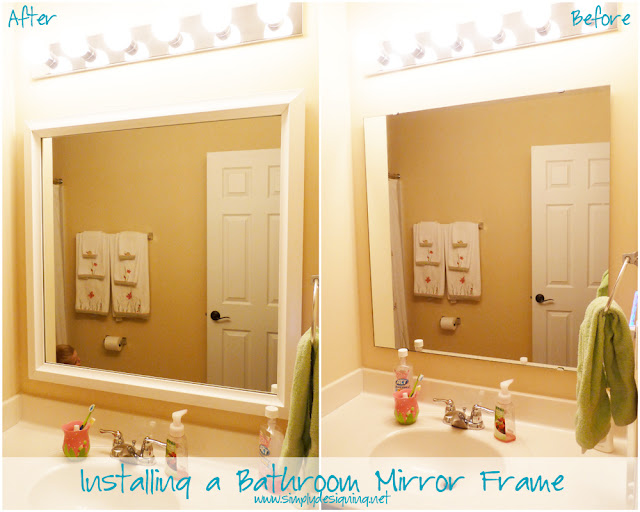
Isn't it just so pretty!? It makes a huge difference in how the bathroom looks I think. My new MirrorMate frame definitely upgrades the mirror from builder-grade to custom! (And I really have a sweet spot for anything custom 🙂
MirrorMate is great about sending sample for a reasonable cost, so I went ahead an ordered a couple of samples first. After we decided on a frame style and color, I simple had to measure my mirror and send in my order. It was really quite simple.
Soon my order arrived and I began to put the frame together.
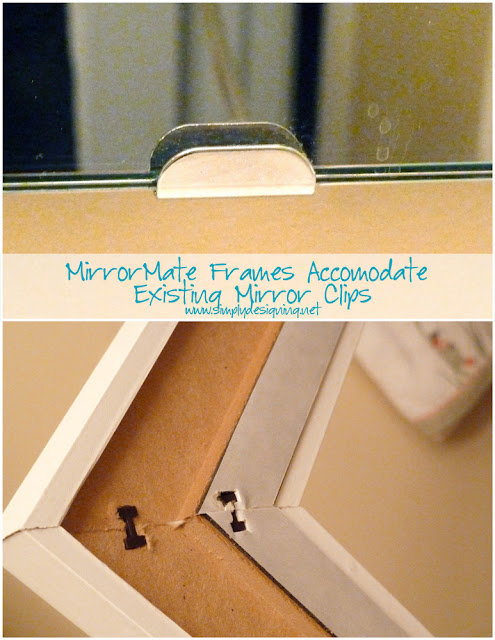
To assemble the frame, you simply lay out your frame pieces, place a little wood glue on the inside corners and then lightly hammer in the little black staple-like pieces into the pre-drilled holes to hold the frame together.
This is so simple and easy to do yourself! You can assemble this in literally just a few minutes!
Don't worry, the frame comes with very clear instructions 🙂 and almost everything you need to complete the job!
One thing that I love about MirrorMate frames is that you leave your bathroom mirror on the wall! This makes installation so easy!
The frame comes ready to accommodate existing metal mirror clips! If you have plastic mirror clips holding your mirror up on the wall, you simple check a box on your order form and MirrorMate will send you a kit to change those out. Easy as can be.
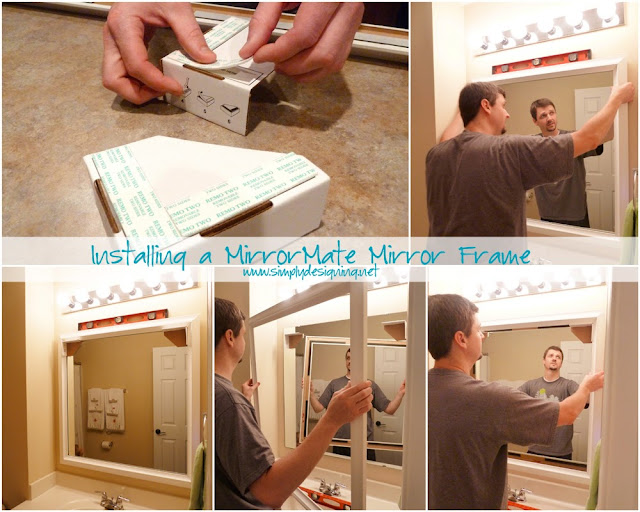
Once your frame is assembled you are ready to install it! You will first want to clean your mirror with rubbing alcohol and then assemble these little cardboard corner things with double-stick tape.
Use your level to place the frame in the correct location on your mirror. Unless you have a really tight fit, you can play with the placement just a little bit to make sure it is centered best for your space.
Double check that you are holding your frame level and then attach the cardboard corners on the inside of the frame. This part of the installation can be done with one person, but it is slightly easier with two people.
Next you will take the paper off of the back of the double stick tape on the mirror frame, and using the cardboard corners as your guide, you will place the frame on the mirror and press tightly to secure.
The total time it took to assemble and install our MirrorMate frame was definitely less then 1 hour! It was a really simple DIY and the results are just stunning!
We have already received compliments on our newly framed in mirror!! (And very very few people see my children's bathroom!)
I personally think it really upgrades the kids bathroom and I LOVE how it looks! I also love that it was so super quick to assemble and install! It really could not have been simpler!
Thanks so much to MirrorMate for providing me with this amazing mirror frame for our bathroom!!
Remember to take advantage of 10% off now through August 3, at http://mirrormate.com/ using code: SIMPLY10
And now I am so excited to be able to GIVEAWAY a MirrorMate Frame!
Wait until Rafflecopter fully loads below and then enter to win:
*Winning entries will be verified. This giveaway is in no way affiliated, administered or endorsed by Facebook, Pinterest, Twitter or Instagram. No information will be disclosed to Facebook, Pinterest, Twitter or Instagram by entering this giveaway. No purchase necessary to win. Odds of winning are based on number of entrants. Winner for each prize package will be chosen randomly through Rafflecopter. Giveaway will run from July 3, 2013 at 6:00am until July 10, 2013 at 11:59pm. Winner will be announced on July 11th, 2013 in this blog post and the winner will need to respond within 48 hours of announcement / email to claim their prize or another winner will be chosen. Winner must be 18 years of age or older and a US citizen with a US mailing address in order to win. Winner is responsible for paying any necessary taxes on winnings. All prizes will be mailed / emailed / fulfilled by the sponsor and the blog owner(s) involved are not held responsible if the prize is not fulfilled. A list of winners may be requested after the giveaway has ended. Please email me with any questions or to obtain additional information at: [email protected]*


Kara
My favorite Mirrormate frame is the Acadia Oiled Bronze! Great giveaway!
Colleen
Love the detail in the Acadia Dove White.<br />I have 2 - 56x60 inch mirrors that meet in the corner in my master bath and would dearly love to have them framed in.<br />Wonderful giveaway. Thank you for this opportunity<br />ColleenB.
Lisa
love this idea, can't wait to update my mirrors!
Lisa
love this idea, can't wait to update my mirrors!
SalBug
The acadia dove white is gorgeous.
Sandi
I've been wanting to do this myself, but the thought of mitering corners scares me! I love the Chelsea Brushed Bronze frame and would love to update my bathroom with it. Thanks for the give-away!
annemarie
Love the acadia dove white and pacifica frames.
Eligonma
My favorite is the Broadway!
MomHomeGuide.com
I love the Acadia Dove White, too! Love the pretty detail.
Linh C.
Grandezza Bronze
Sheena
I need this! I love the Cherokee in Mocha Walnut. {fingers crossed}
Jennifer Jury
Pacifica White Cap!!
Jen McIntosh
The Cherokee Slim Mocha Walnut would look great in my bathroom!
Melissa M.
I like the Acadia Dove White
Mel How
Love the Lexington.
April Cardella
Love the new Lexington style, would love to win it!
LeAnne
I'd love to put the Chelsea Classic White in my boys' bathroom!
Christina Andersen
This comment has been removed by the author.
Christina Andersen
I love the bellemede vintage silver frame. So elegant. Thanks for the great giveaway, this would be perfect in the bathroom in the house we are about to move into.
michelle
Love all the brown tones. Cool product!
Shanna
I like the chelsea pewter bronze!
Elizabeth
I love the Pemaquid Dark Bronze!
Kimberly
Bellemeade Vintage Silver might be my favorite. These are beautiful!
Deb Mathenia
Mediterra Glazed Earth is my favorite -- so many great ones to choose from 🙂 [email protected]
The Fam
Pemaquid Porcelain White<br /><br />shannoncarman at yahoo dot com
Melissa
I love the Chelsea Brushed Bronze mirror. I stumbled across this site while looking for options to DIY our bathroom mirror frame, but this looks SO. MUCH. EASIER!
Vinylgiftsandmore.com
We are remodeling both bathrooms at the same time (crazy I know) and this would be awesome to have for our mirrors. I like them all!
Jenny
I like the Pacifica White Cap.
S A R A H
loved the Pemaquid Porcelain White
kristen steel
Acadia Dove White is the bomb. I would soooo love to have this for my girlies bathroom. I have been drooling over MirrorMate for months now- - winning this would make my month!!!
Kelley Wilson
I want the Lexington in Metallic Ash! I have so badly wanted one of these for our main floor bath, I would also love a white one for my boys bathroom!
Jessie Freebairn
Pacifica White Cap
Kelly Rae
chelsea brushed bronze is my favorite
Lisalulu
had no idea these existed Grandezza is for me!
JR L
I love the Acadia Dove White
andyashleigh
I love all of them, but the acadia dove white would look great in the kid/playroom bath! missashleigh at juno dot com<br />
Margarita Law
I love the colors of the bathroom. It looks so neutral and simple. The mirror as well is wonderfully installed and I love it. Great job on the installation process! I am sure your kids would love it. Very well done! -<a href="http://www.illuminada.com/" rel="nofollow">www.illuminada.com</a>
Aarsun Woods
Lovely design!!! These wooden mirror frames looks so classy and stylish. Thanks for sharing