When I had my daughter, 3 years ago, and wanted to cover her car seat so she could sleep or so that no one would disturb her, I would throw a blanket over the handle bars and call it done. She was covered so it worked but you still had to put your arm underneath the blanket if you wanted to carry the car seat which was a bit inconvenient and still let light in. And heaven forbid a strong wind come along and that blanket was half way down the street before you knew it!
Apparently, in the last 3 years, some wonderful person came up with an idea to remedy this!
I started noticing a few of them around town and just thought they were the greatest thing ever! And with number 2 on the way, I decided I pretty much needed to have one. I assumed that I could find and buy one off of an Etsy shop somewhere if I wanted to, but it looked so easy to make I thought that surely I could find a way to make this myself!
(Enter my husband’s raised eyebrows here.) Ok, so I can do floral design, interior design, even manage some crafts, but sewing is not my forte. Let’s just say I have had a few mishaps with sewing during our marriage. Ha ha ha! However, I am proud to say I can sew a straight line so I figured I could do this project on my own for sure…if only I could find instructions somewhere…
I found a great tutorial here and, also, fell in love with the fabric that she had done it in! My instructions below are an adaptation of the tutorial I found. For more information or to see all her detailed photos, go here.
Unfortunately, where I live there are very few fabric stores and needless to say, most of the fabrics are uninspiring. However, my mom lives close to lots of great fabric stores….so she was able to find the exact fabric for me that the tutorial had used! I was so excited!
I still had great plans to make this. My mom was coming out to visit for Christmas and was going to bring the fabric for me so I could do the project. And as it turns out, I ended up in the hospital for several days and then was put on strict bed rest starting a week and a half before they came out. Just my luck.
So this project ended up being a joint me/mom project...with me mostly being a supportive peanut gallery and with my mom doing most of the work. Thanks mom!
But I am just SURE I could have done it on my own if circumstances were different! It really is THAT easy!
So here we go! How to make a fabulous car seat cover!
You will need:
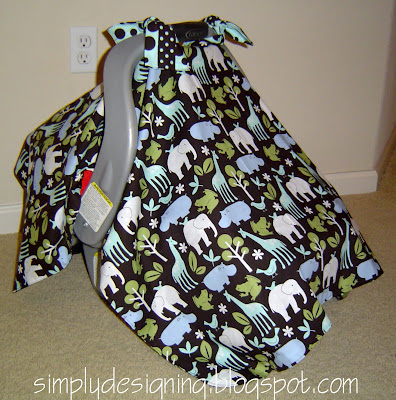
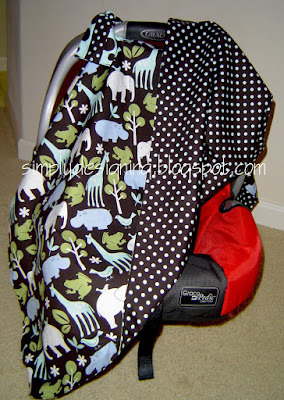
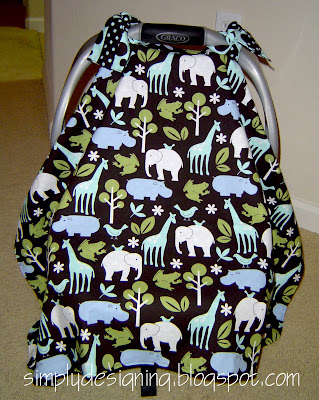
• 1 yard each of two coordinating or same fabrics (this is for the main part of the cover and the underneath side of it). HOWEVER, if you choose a directional print like I did, you will need more fabric so that the “animals” in my case, are facing the right way and not to the side. I used the animal print for the front and a brown with turquoise dot print for the underneath side.
• 6” width of another coordinating fabric that will end up being the turquoise with brown dot fabric on the handles/straps that you see in my photos.
• 2.5” width of another fabric (this is the brown with turquoise dot fabric you see on the handles)
• Sewing machine
• Thread
• Fabric scissors
• Iron
The How To:
1. Cut the main fabrics to approximately 37”w x 45”l (this allows for ½” seam) where “l” is your total length from front to back and “w” is your total width from left to right across the carrier. However, I suggest measuring your car seat carrier. If I had followed the original directions to the letter, my cover would have been a bit short for my carrier. So use your carrier as a guide.
2. Round the corners.
3. Place the two fabrics, right sides together and sew them with about a ½” seam, leaving a little space for turning.
4. Notch the corners, iron the seams open and turn so right sides are out.
5. Iron the whole thing.
6. Edge stitch around the entire blanket.
7. Cut each of the remaining fabrics for the handles in half so you have two 6” x 22” pieces and two 2.5” x 44” pieces.
8. Using the 6” wide pieces, with right sides out, fold both edges in to meet the middle. Iron.
9. Do the same with the 2.5” wide pieces.
10. Lay the narrow strip on to the wider strap so all unfinished edges are facing each other. Do for both straps.
11. Sew both the narrow and the wide strips together.
12. Tuck the ends in and edge stitch both ends of each strap together.
13. Sew the straps on the blanket.
- Again, measure your particular carrier, but on mine, we sewed the straps 19” down from the back side edge of the blanket. And used 5” clear spacing between the two straps.
- Each strap was sewn in a square shape onto the blanket that was about equal to the width of the narrow strip.
Tie those handles/straps on to your car seat carrier and voila! Wonderful, miraculous car seat cover that won’t blow away in the wind and will allows you to keep baby covered even while carrying it!
I just can’t wait to use this!
Keeping it Simple
A Soft Place to Land
Today’s Creative Blog
A Silly Little Sparrow
My Frugal Family
Tip Junkie
Someday Crafts
Beyond the Picket Fence
The Shabby Chic Cottage
Tales from Bloggeritaville
Fireflies and Jellybeans
Skip to My Lou





Lelan @ Good Gravy!
I wish I knew of this idea when my kids were infants! Great tutorial. <br /><br />And thanks for stopping by my blog! I look forward to seeing your post about the Vday printables! 🙂
Heather@ theherberfamily.blogspot.com
I am planning to make one of these soon for my cousin, who is expecting!
Heather@ theherberfamily.blogspot.com
Please feel free to add these to Talented Tuesdays at My Frugal Family!<br /><br />http://theherberfamily.blogspot.com/2010/01/talented-tuesday.html
sarah
so cute! I love the fabric!
Maridith
Love this!! Wish I had this when I had my son in the dead of winter and wanted to keep him covered. Great tutorial!! Thanks for sharing
B : )
this is a fantastic idea - I'll pass it on to my step-daughter. Thanks for sharing.<br /><br /><a href="http://bleemcguire.blogspot.com" rel="nofollow">Why don't you come on over to my blog and visit a while</a>
simplydesigning.blogspot.com
Lelan - Thanks for checking out my blog!
simplydesigning.blogspot.com
Heather - Good luck making one of these for your cousin! I would have loved to receive one of these as a gift! Send me photos to let me know how it turns out!
simplydesigning.blogspot.com
Sarah, thanks for stopping by my blog!
simplydesigning.blogspot.com
Maridith, thank you for stopping by my blog and checking out this tutorial!
simplydesigning.blogspot.com
B :), Thank you for visiting my blog! I hope this is helpful for your step-daughter! I will be sure to check out your blog. Thanks for the link!
Lori
Love it! Neat idea!<br /><br />Thanks for joining my party Get your craft on Thurs. I hope you join me next week. Mr. Linky disappeared for a while tonight I thought I lost all of my guest, but it finally came back. I will not be using Mr. Linky anymore!
simplydesigning.blogspot.com
Lori, thanks for checking out my link! I enjoy your parties! I am so sorry to hear you had Mr. Linky issues. I am interested to see what other link party source you use though!
PlantSomeRoots@Lakewood
Awww...so cute!<br />Cindy at Lakewood
simplydesigning.blogspot.com
Cindy, thank you for visiting my blog! I am glad you like this car seat cover!
Cha Cha
I just wish I had a baby to put underneath there. You did a great job, and I will keep it in mind for future bab showers. Thanks for sharing.<br /><br />Cha Cha
The Persimmon Perch
Love it. I find out next week what I am having and I can't wait to get started adapting things for the new one. Love your tutorial. Thanks for sharing with Made it Monday! Jules
this blessed nest
this is brillant! honestly. those old blankets will blown in the wind during winter. the ties are so smart of you! i know - i have twin babies. (they are in the next size carseats, however.) but honestly, you have something here!<br /><br />awesome!
simplydesigning.blogspot.com
Cha Cha, thank you so much for visiting my blog! This would make a fabulous baby shower gift!
simplydesigning.blogspot.com
Jules at the Persimmon Perch. Congratulations on your pregnancy! That is SO exciting! Good luck and if you decide to make a car seat cover, send me photos! I would love to see them! Thank you!
simplydesigning.blogspot.com
This Blessed Nest, thank you so much for visiting my blog! I am glad you like the idea...I had to hold on tight in the winter to the blanket I put over my daughter's car seat too...this will be a MUCH improved version for baby #2. And I should get to use it within a month! Hurray!
Carolyn @ My Backyard Eden
That is such a great idea. When my kids were babies I'd just throw a blanket over them too! This is so much more stylish. LOVE the animal fabric you chose. <br /><br />Thanks so much for linking up to Make It Yours day this week. I look forward to seeing more of your great ideas!
Its So Very Cheri
It looks great. Thank goodness for Moms. <br /><br />Cheri
Its So Very Cheri
I added your button to my side bar and would love for you to add mine,<br /><br />Cheri
simplydesigning.blogspot.com
Carolyn - Thank you for stopping by my blog and for the nice comments! I have such a hard time finding fabric I love where I live, but I definitely fell in love with this animal print!
simplydesigning.blogspot.com
Cheri - thanks so much for stopping by my blog! And thanks for adding my button to your blog! I added yours on my blog under the featured catagory!
Tiff @ Making The World Cuter
Love the carseat cover and will for sure need to make one for my number 4! Thanks for sharing with me all the time! Love your stuff!<br />-Tiff
Kaysi
I love this, I'll have to try this out!<br />Kaysi
bec4
I love this. I have a few baby showers coming up--great directions too. Thanks for linking up!
fawnda
very cute! I love the fabric!
Leigh of Bloggeritaville
Fabulous!<br />Thanks for linking up to Thrifty Thursday this week!<br />Hugs,<br />Leigh<br />Tales from Bloggeritaville<br />www.lbratina.blogspot.com
Anonymous
Good brief and this post helped me alot in my college assignement. Thank you for your information.
The Price's
This is a wonderful idea! What a great baby gift. I am wondering if there is a way to make it reversible?? I have a monogramming machine, so I can monogram a name at the bottom to add to the cuteness....<br /><br />Nice job!!!! I've added you to my blog list. Can't wait to see what else you have in store!<br /><br />Paige
Micah and Tawni
Adorable! We have the same graco pedic car seat, you did mention that yours would be a bit short if you had followed the dimensions exactly, what did you end up cutting the fabric to?<br /><br />Great blog!
Anonymous
This comment has been removed by a blog administrator.
Anonymous
This comment has been removed by a blog administrator.
simplydesigning.blogspot.com
This comment has been removed by the author.
simplydesigning.blogspot.com
Micah and Tawni - The finished size for my cover is 36"w x 44"l. I would love to see picts if/when you make one! Good luck and thanks for visiting my blog!
Anonymous
This comment has been removed by a blog administrator.
Anonymous
This comment has been removed by a blog administrator.
Meredith
Neat idea, and the tutorial makes it seem easy! Thanks for sharing. Oh, and what adorable fabric you have!
Heather@ My Frugal Family
I never did get around to making one of these, and I know I don't have enough time/fabric on hand to make one by this weekend, but I may still try this for once my new cousin is born!<br /><br />Thank you so much for posting this to Baby Week at My Frugal Family! I've featured this post on my Talented Tuesday post this week!
Anonymous
This comment has been removed by a blog administrator.
Anonymous
Rather cool site you've got here. Thanx for it. I like such themes and everything that is connected to this matter. I would like to read a bit more soon.<br /><br />Anete Kuree